What is the first thing that comes to your mind when you hear the word ‘flow’? Most probably you imagine movement - a movement of an object through a certain environment. For example, it might be a movement of a physical object through air or water. Or you might image user’s movement through websites or apps. In both cases, the smoother the flow, the easier for the object to travel through an environment.
Designers spend a significant amount of time perfecting individual screens. The results of such work might be really impressive - clutter-free screens with clear visual hierarchy. At the same time, designers often forget that users don’t land on those screens out from of nowhere. They go through a specific sequence of actions which leads them through an app as they try to accomplish their tasks. It means that flows are just as crucial to good user experience as individual screens.
User flow is the path taken by a user on a website or app to complete a task. This path can be represented as a sequence of user’s actions. For example, a user flow of ordering a ride using Uber might look like this:
Uber is an excellent example of linear user flow. But for most products, user flow is rarely linear — it might contain decision nodes and loops. A user flow of a purchasing a product might be represented as multiple iterations or comparing a product with alternatives. Because there are many different paths a user can take, user flows are often modeled as flowcharts with nodes for each of the significant navigational paths.
When it comes to creating a new project, the primary goal of designers is to fulfill the business objectives. Business objectives might be getting users to sign up for a service, make them purchase products or subscribe to a newsletter. When a product fails to satisfy business objectives, it doesn’t bring any value for product owners. At the same time, it’s essential to consider user objectives - the desires or needs that users want to satisfy.
That’s why it’s essential to build a flow with end-user in mind. When crafting user flows, designers should ask themselves following questions:
The answers to those questions will inform how to design individual pages - what content and navigational options to include.
Quick tip: It’s evident that creating smooth user flow starts with a deep understanding of target users. Thus, even before beginning to sketch anything it’s essential to conduct a series of interviews with your users or customers. Try to understand target user’s motivations and needs.
User journey map is a powerful design tool that helps you capture the experience of a user when they interact with a product. The map describes users feeling and thoughts while they interact with a product. And this information can be an excellent foundation for user flows.
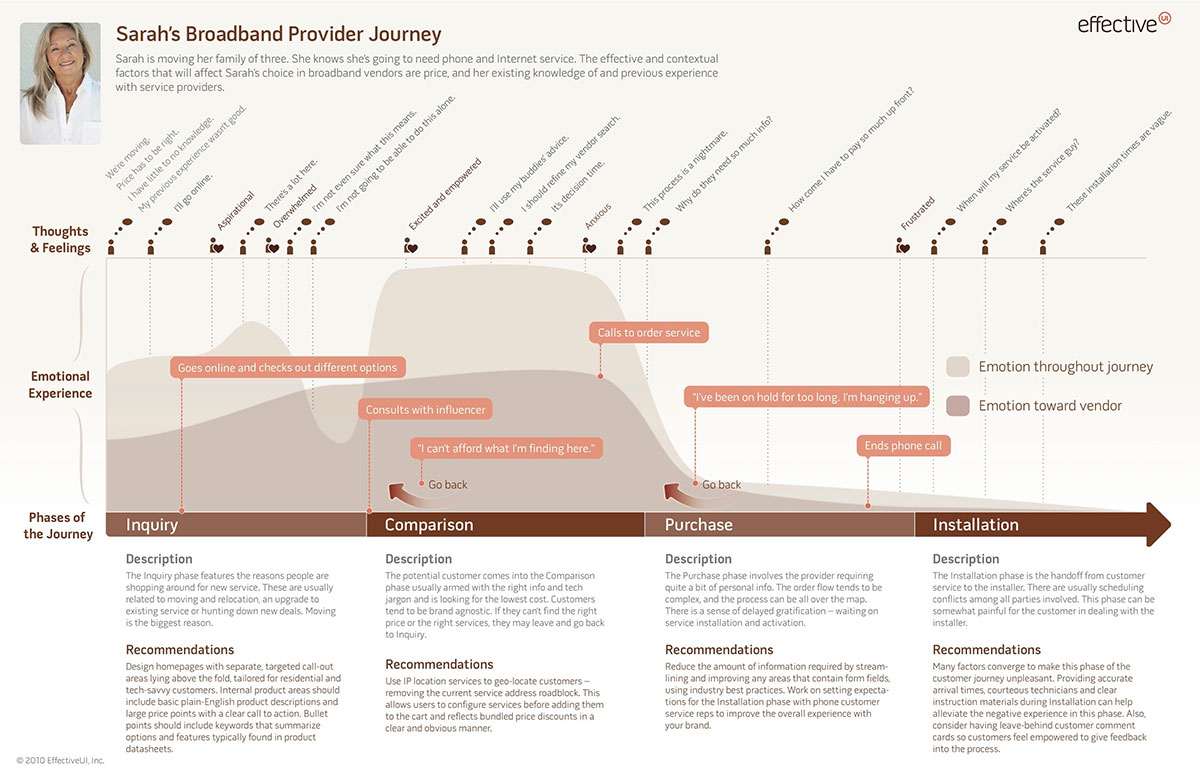
User journey map can be a great foundation for your user flows. Image: Effective
During meetings with clients or team members, designers often need to demonstrate user journey. But despite that idea of user flow might sound simple, it might be hard to communicate user flows during those meetings. Some designers strive to draw out every state of a flow but doing that might be time-consuming especially during ideation phase - during ideation phase, designers usually have a lot of different ideas and not sure what idea works the best. Skipping visualization altogether isn’t better - when user flows is represented as written stories they become not very representative (when user flow is described in the format of written stories, team members will have a hard time imagine the flow).
Creating a simple outline for user flow might be an excellent compromise. An outline will help you understand what pages you’ll need to design and how they’ll be connected to each other. Ryan Singer from Basecamp proposed a shorthand approach for writing an outline. This approach is based on a relatively simple idea - treat user flows as ongoing conversations. This format is really fast to sketch, and it communicates the essentials of what needs to happen during each step of the journey.
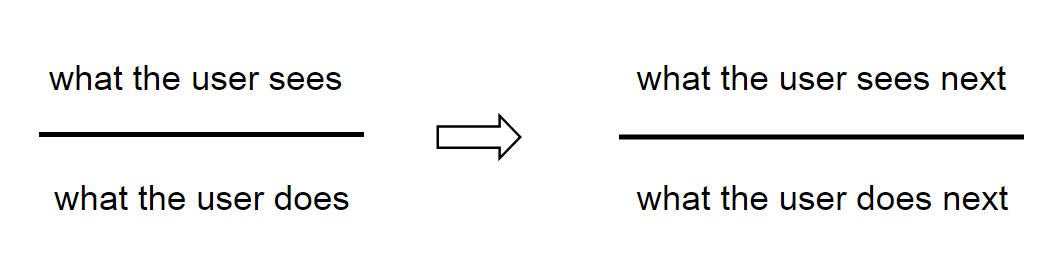
Above the bar is what the user sees. Below the bar is what they do. An arrow connects the user’s action to a new screen with yet another action
One common mistake done by many product teams is creating a prototype without having a strong outline for the user flow. Without an outline, a prototype is just a collection of separate pages. But when a prototype is based on the outline, it becomes a tangible version of a user flow. Prototyping is a way to bring the flow to life by adding more details.
Refining user flow is an endless cycle of building-testing-learning and prototyping can help you with that. Using a prototype, it becomes easy to validate any hypothesis. Thus, before committing to any particular flow, create a simple prototype to prove that it’s designed accordingly to your user and business objectives. After the validation, you’ll know what adjustments should be done to make the flow better.
An interactive prototype can help you explore different user flows. Using a digital prototyping tool you can link up your pages and create as many flows as you need.
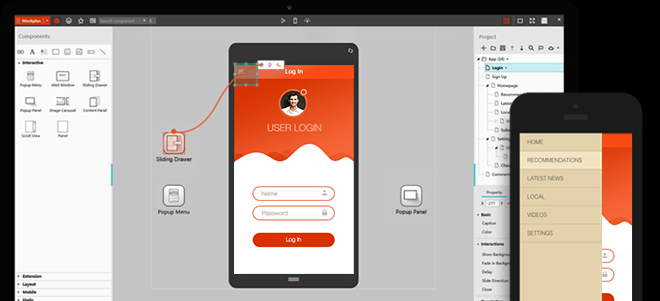
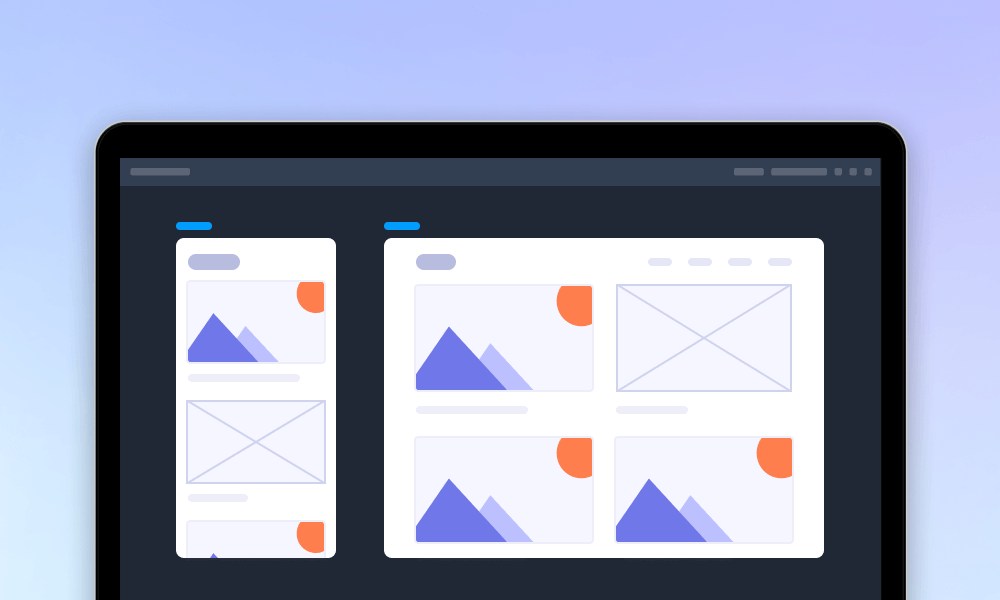
Prototypes demonstrate how the product will work. Using a prototype, it’s possible to communicate the user flow to team members/stakeholders and receive the feedback. Adding interactive actions using Mockplus.
Once you finalized your user flow and prepared a high-fidelity representation for it (in a format of a hi-fi prototype), it’s time to conduct user testing. Ask people to use the product (perform regular tasks) and have them comment out loud. Ideally, you should recruit test participants who match your ideal customer profile and observe them in person, but if it’s impossible, you can use services like usertesting.com.
Testing can help you solve a fairly common problem - when you have a few solutions for a problem and not sure which solution works the best for your users. You can conduct A/B testing to determine which of the solutions will actually have a positive impact on your user flow.
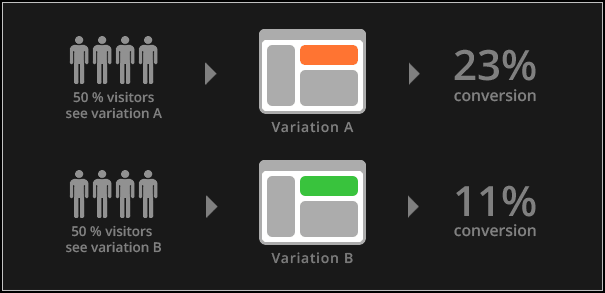
A/B testing is the process of comparing two different versions of a product against each other to see which one performs better. Image: vwo
The process of designing user flow doesn’t stop after the product released on the market. It’s possible to measure the success of a flow in terms of efficiency. Even if you get the flow right (the results of user testing is good), focus on optimizing different steps of the flow.
Collect data on each step in a user flow and evaluate how your users navigate through your product. For example, if you design a checkout flow for e-commerce app, data will indicate where your users experience problems and might need help.
When it comes to digital design, the success of a product is often contingent upon how well user flows are designed. User flow is a powerful tool in designer’s toolkit because it allows designers to see a big picture. Designers are able to understand what pages they need to create and how those pages should be connected to each other.
 Mockplus RP
A free prototyping tool to create wireframes or interactive prototypes in minutes.
 Mockplus DT
A free UI design tool to design, animate, collaborate and handoff right in the browser.


 Sign up with Google